

Recently, I was very excited about the release of the Beachwaver, the new automated curling iron created by Sarah Potempa. I knew right away that I had to review the Beachwaver!
I’ve had my hands on one for a little bit now, and I have to tell you that I am obsessed! The curls are very easy to create, the automation makes it much faster than using a regular curling iron, and the heat (I turn it all the way up because I’m a bad girl) really “locks” the curl in, so my curls last all day. Really, all day. The pic above was taken about 9 pm. I had curled my hair before 7 am, gone to work (and it was insane in the unit that day), and then I came home to my 13 month old, forever pulling on my hair… you get the picture. Somehow my curls were still intact, which isn’t terribly unusual, but what was different is that they looked exactly the same.

Getting these curls is pretty easy, I’m faster each time I do it. It takes me about 10-15 minutes currently, though this is somewhat dependent upon the size of hair pieces that I use.
In honor of Sarah’s position of Aussie Celeb Stylist, I opted for Aussie Products with the Beachwaver. Note that I added in the mousse and hairspray for extra hold. I did receive directions from Sarah that didn’t include them. When using her directions, my hair does stay curled, though it relaxes into more of a classic “wave” throughout the day. If you have a crazy life like me or your hair likes to go flat, add in the mousse and/or spray like I did.
First, I apply a few pumps of Aussie Smoothing Serum to my wet and clean hair, concentrating on the ends and mid-shaft. I then apply roughly a large egg’s worth of Opposites Attract Strong Hold and Soft Touch Mousse. I concentrate this on my roots and mid shaft, somewhat avoiding the ends. I then comb it all in with a wide tooth comb. This will distribute both products more evenly, helping to add hold and protecting against frizz.
Next I flip my head over and roughly blow it dry. When it is about 75% dry I take a small break and spritz a little Aussie Heat Protecting Shine Spray into my hair, avoiding my roots and concentrating on the upper layers of my hair. For some reason I tend to get more shine when it is applied to mostly dry hair. I then dry my hair the rest of the way, now using a brush to help dry my hair.
Once my hair is dry I can start curling! To prepare, I divide my hair into halves (a left and right half) and then further into top and bottom. I pin the top sections out of the way and start with the lower sections.
Select Left (L) or Right (R) on the Beachwaver based on the side of your head you’re curling. This will control which direction the curling iron rotates to ensure both sides look flawless
You can vary the sizes of hair chunks that you curl, but I do about a 1 inch section. Clamp the curling iron near the ends of the hair (always start with the clamp facing you so it rotates away from your face) and press the “GO” button to automatically rotate and curl your hair. I hold for about 10 seconds and then repeat on another section.
Once everything is curled, I run a little Aussie Anti-Frizz Cream through my hair for a smooth finish, and then lightly mist with a hair spray for added hold.
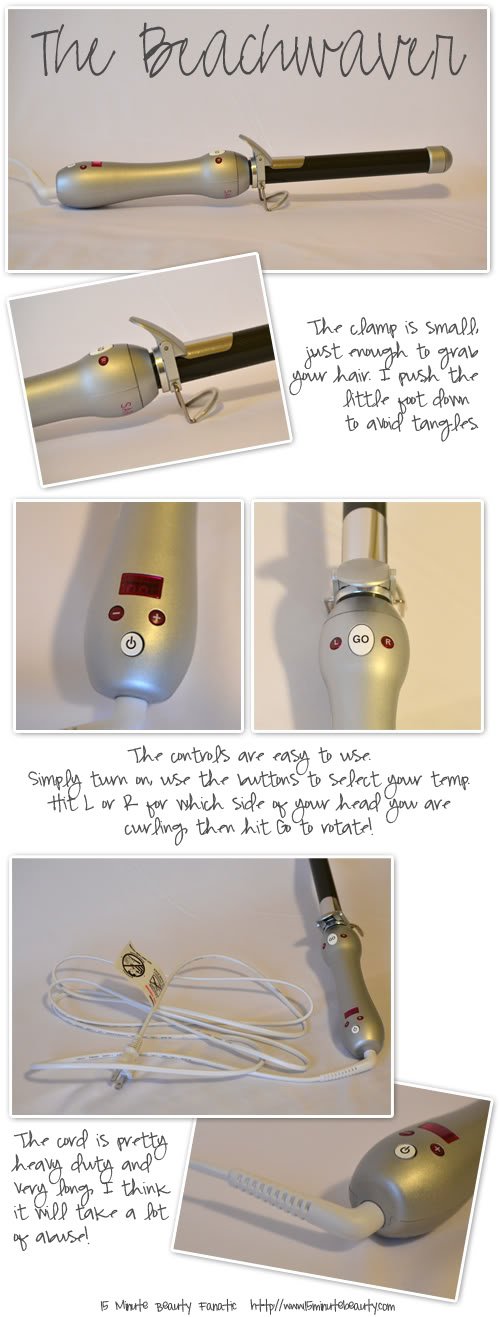
Here’s a little peek at the BeachWaver itself. The entire curling part, including clamp and the curling iron, rotate. I was impressed that it feels pretty substantial, especially the cord. It doesn’t look at all cheap, so you know that it will stand up to a lot of abuse! I’ve used it about 6 or 7 times now and it just gets easier each time.
Update!
Over at Polishy of Truth you can find a great review of the BeachWaver in which Tara tried out the BeachWaver and got a great look that lasted all day. She brought up a few points that I agree with and want to add here, since they’ve become a bit more obvious to me as I’ve used the BeachWaver longer.
• The BeachWaver doesn’t do a great job of creating larger curls/waves. It’s really true. The look above was much curlier with smaller curls than I had been aiming for. The truth is that the clip isn’t quite big enough to hold a bigger chunk of hair, and while I’m sure that I could hold it with my fingers, I’m not sure that I want to do that! Even if you could use a bigger chunk of hair, I’m not certain that you’d want to do that. By the time the hair on the outside of such a big hunk of hair got heated up enough to curl I think you’d be burning all of the hair underneath? I’m not sure that a heat protection spray could help save that hair. Just my thought.
• I’ve been using it a lot since writing this review, and I think that the BeachWaver looks best the day after you use it. My hair is definitely curly on days that I use it, then I sleep on it, and use a dry shampoo on day #2. I touch up the upper layers of my hair, and if I have somewhere to go I might hit them with a little bit of hair spray, otherwise I just rely on the gel that was originally in my hair. This is when I can get the super pretty looser curls/waves. I love this for when I’m being stay at home mommy (which is most days).
• I wish the controls were in a slightly different location. I’m really good at hitting the “go” button when trying to put my hair into the clip, which somewhat back fires on me. I’m kinda glad to hear that it wasn’t just me!
Overall, I’m still loving my BeachWaver. I’m using it more and more, and I’ve gotten faster at using it though I doubt it will ever be less than a 10-15 minute process for me. It isn’t something I can do on a work day (that’s when I have my 15 minutes), but it’s definitely do-able on mommy days when my 14 month old is in her morning nap!
You can buy Sarah Potempa’s BeachWaver here
 I’m a doctor, a mommy and a bit of a beauty addict. If you let me, I can take 2 hours to get ready in the morning. Really. I'm on a quest for faster beauty that works!
This sounds like even I could use this! I can't use a regular flatiron, but I can use the InStyler… this seems like a similar concept!
Wow, I can't believe you can curl it so fast! From your descriptions it sounds like my hair is a lot like yours (long-ish, super thick) and I have never been able to curl my hair in under 30 minutes with a curling iron. I'm so impressed!
I splurged and bought one today! I say splurged because I recently just bought a Sultra Seductress with the intent of getting this look. I can't get curls and waves to save my life with it, but it is AH-MAZING at straightening so I'll keep it!
I am very familiar with what a workday for you is, so seeing that pic sold me 🙂 I can't wait to get it!!! I think by Wednesday 🙂
~Tara
I'd love to try this. I'm afraid I'd burn my thumb because the clip is so small. I keep trying to imagine it. I guess the only way to know is to go for it.
I just bought one and because of the intense heat, especially on my ends, I am curious if i can use a heat protectant right before using the iron? Thank!
YES!!! Definitely use a heat protectant, especially on your ends. I fried my hair using my beach waver last year when I skipped it one day, and it was about 6 months before my hair was feeling more "normal". I also recommend trying lower and lower heat settings until you find the minimum you can use. I'm about 380, which is much better for my hair than the 410-420 I was using!
I want to know how this works on African American hair or as we do use a lot of weave. Has this product been tested on these types of hair.
I'm not sure if it was specifically tested, but it works like any other curling iron. The temp can go up to 450, depending on your hair tip or weave that may or may not be high enough for you.