

I have written quite a few posts with different concealer tips, but they cover different topics and are both here on 15 Minute Beauty and over on Babble. Lately I’ve gotten a lot of emails with questions about concealers, how I use them and my favorites. I thought I’d put together a quick post with some of my favorite tips in one spot!
1. You need different shades/consistencies on different parts of your face
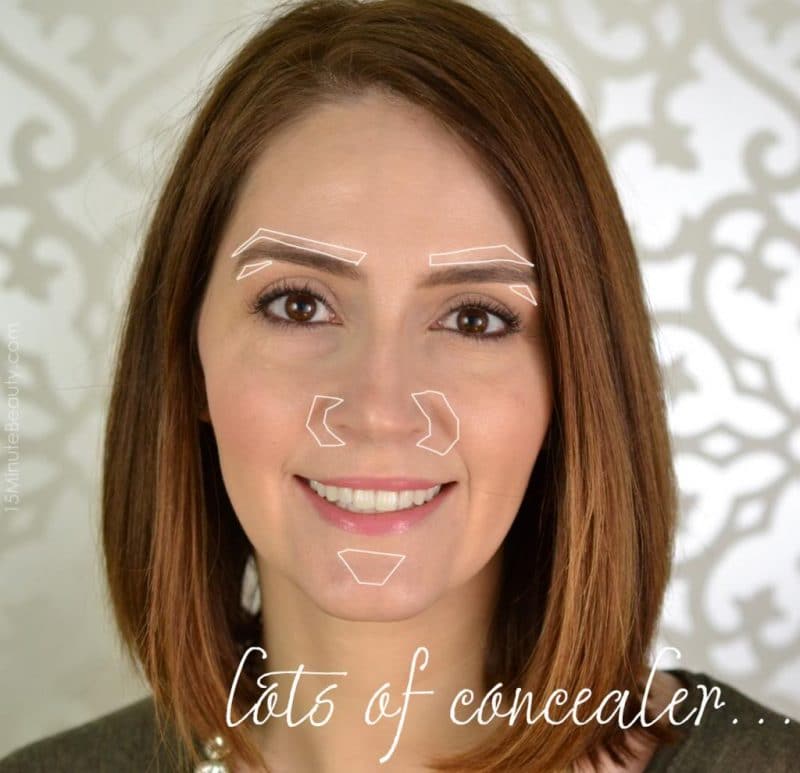
When talking about concealers, I default to talking about my undereye area. But the truth is, concealer needs to be applied to more area than just under your eyes. Blemishes, redness around your nose and in the middle of your chin… all of these are great areas to apply concealer.
Under your eye your concealer usually should be about 1 shade lighter than your skintone to compensate for shadows and darkness. If you go much lighter than that, you’ll be creating obvious white areas under your eyes that are just as bad as the circles you’re covering up! Concealers on the rest of your face should be the same color of your face. Do you want light colored spots instead of pimples? No, it isn’t really an upgrade.
2. You may need to color correct before using concealer
If you’re trying to cover up a strong discoloration, you may need to use a color corrector before your concealer. A light layer of corrector under your concealer can save you 3 layers of concealer and will give you more natural results. It can be tricky to find the right color of corrector, but here’s my guide to how to use color corrector and concealer.
Products to Try:
Face Stockholm Corrective Concealer
Maybelline Corrector Concealer
NYX Concealer In A Jar
Tarte Colored Clay CC Undereye Corrector
3. Always prep your skin! Apply over eye cream or primer
If your skin is dry at all, concealer is really great at grabbing on to those areas and looking even worse. As well, the more pigmented your concealer, the more likely it is that it will settle into any fine lines or wrinkles. Applying a good moisturizer first, which plumps up the outer layers of the skin, gives you a smoother surface to apply your concealer to.
Products to Try:
Olay Total Effects CC Eye Brightening CC Cream
Clinique All About Eyes
Kiehl’s ‘Midnight Recovery’ Eye Concentrate
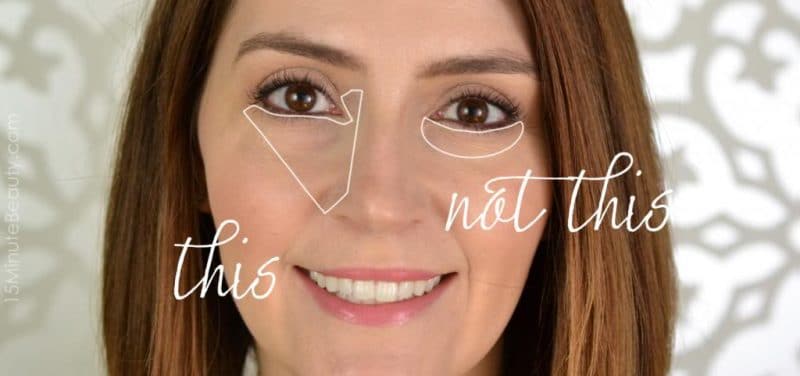
4. You need to apply to a bigger area than you think
If you really want to cover up undereye issues, you’ll get more natural results if you apply in the triangular pattern seen above (don’t forget that inner eye area). I concentrate the concealer closer to my eye (concealer should go up to the lash line) and inner corner, but it does extend down to my nose and creates a triangle. Blend outwards, you don’t want an obvious line.
5. Dot the concealer over the whole area you want to cover! It is hard to spread.
I usually apply a little concealer to the back of my hand (body heat with melt it a little making it easier to work with), and then using a fingertip will tap concealer onto the area of application. The thicker your concealer it, the hard it will be to spread around. Save yourself some time and just tap around a slightly bigger area, you won’t have to spend as much time trying to blend the concealer.
6. When applying, you need to pat/dot, not smear
Instead of smearing or spreading it around, you should tap the product around the area to blend or distribute it. The smearing just removes product, tapping will put the concealer where you want it.
7. Mixing can be your friend
I’ve mentioned it sometimes on 15 Minute Beauty, but I really explained product mixing in more depth over on Babble. Basically, even though I’ve already prepped my face with a primer or moisturizer, I very rarely use straight concealer on my undereye area. I mix in products. If I feel a bit dry and want to thin out my concealer, I’ll add in a little primer. I almost always add in a little highlighter to bounce light away from the area (the Smashbox Photo Op Undereye Brightener is my fave).
8. Bending tools are also your friend
I rarely get the exact look I want just by blending with a fingertip. While I sometimes will blend a little with a brush (the IT Cosmetics foundation and concealer brushes are nice), the real secret is the BeautyBlender sponge. You can experiment with using the sponge slightly damp or dry. I prefer the look of a dry BeautyBlender. I just bounce the BeautyBlender over the entire area once the concealer is where I want it to be. After blending you can’t even tell I have any concealer in the area!
9. You need to set it
Not everyone likes the look of powder on their skin, but I swear to you that over the last 5 years or so powder has come a long way! Many powders are so finely milled that you can’t even see them on your skin, there are powders with illuminating additions (super helpful under the eyes) and even slightly yellow powders so they’ll help cover up circles better. Without the powder, your concealer won’t stick around all day. Really, who wants to suddenly look tired at 2 pm? Not me!
My faves are Bobbi Brown Sheer Finish Loose Powder (in Yellow), Cover FX Illuminating Powder and e.l.f. Studio High Definition Undereye Setting Powder.
10. You can use it for things other than concealing
Take a peek up there at the picture at the top. Notice that I put some concealer on top and underneath my eyebrows? Those areas aren’t dark, they aren’t in need of concealer. But, putting a little concealer underneath the brow and on top just cleans them up and almost gives me a brow lift. I swear. I use a concealer pencil for this, just 1 line on either side of the brow, blend quickly with fingertip and done! Less than 30 seconds.
I also use concealer for contouring. Rather than the bronzer that most people use, which usually looks more orange on my skin (except for Too Faced Milk Chocolate, but I think concealer is faster). I use concealer pencils that are too light for my skin for highlighting areas and too dark to contour. Just blend with a finger or a foundation brush!
My faves for contouring and around my brows are all pencils. I like the NYX Wonder Pencils, CoverGirl, L’Oreal and Urban Decay pencil concealers.
Finally, I love to use concealers to increase the coverage of my BB Cream. I mix a little in and I can skip a ton of steps.
11. It might not be the best option for you
I usually talk about highly pigmented concealers on 15 Minute Beauty because that’s what I use and need. I have a friendly little blood vessel under one eye (it has been there as long as I remember, even in elementary school), and if I don’t cover it up then I get told all day long that I have an eyelash under my eye. It drives me batty. I also like that I can mix the highly pigmented concealers with other products, such as with BB Cream to get a little more coverage on my entire face.
My favorite highly pigmented concealers are Amazing Cosmetics Amazing Concealer, Laura Mercier High Coverage Concealer and IT Cosmetics Bye Bye Undereye.
But, highly pigmented concealers aren’t a great option if you’re a little older or have dry skin. They’re great at settling into fine lines, wrinkles and dry skin. If you have any of those, less is more. I’d look into a lighter weight concealer, preferably one with a little highlighting capability.
For lighter coverage concealers, I like Make Up For Ever Lift Concealer, and Maybelline Fit Me. To add in a little highlighter, you really want YSL’s Touche Eclat, but I do think that Maybelline’s Dream Lumi is a decent (and much cheaper) substitute.
Affiliate Links, PR Sample
Some of the products mentioned in this post were sent for review, but most I bought for myself (or repurchased after they were sent).
 I’m a doctor, a mommy and a bit of a beauty addict. If you let me, I can take 2 hours to get ready in the morning. Really. I'm on a quest for faster beauty that works!